Sewing Saturday - Tote Bag (Part of Crafting a Creative Summer)

Today we’ll be learning how to make a tote bag. I’ll include measurements for a mini version like I’ll be making as well as a full sized version.
Materials list:
½ metre(yard) of heavy weight cotton or cotton canvas (main fabric)
½ meter(yard) of lining fabric (can be same as main fabric)
½ meter(yard) of heavyweight fusible interfacing
4 sets of 2cm (¾ in) gromets
1.5-2m of rope (for handles)
Coordinating thread
Tools list:
Scissors
Cutting mat and rotary cutter (optional)
Marking pencil, chalk or similar
Ruler or sewing gauge
Pins or sewing clips
Sewing needle
Iron & Ironing Board
Sewing machine
Grommet tools
Cutting list:
For mini tote:
Cut two 25cm x 35cm (10" x 14") rectangles of main fabric (Make note of directionality of fabric before cutting, panel is wider than it is tall.)
Cut two 25cm x 35cm (10" x 14") rectangles of lining fabric (or main fabric)
Cut two 25cm x 35cm (10" x 14") pieces of a heavy weight fusible interfacing
Optional Interior Pocket:
Cut one 10cm x 18cm (4" x 7") rectangle of a coordinating fabric (or main fabric)
Cut one 10cm x 18cm (4" x 7") rectangle of lining fabric (or main fabric)
For full size tote:
Cut two 35cm x 48cm (14" x 19") rectangles of main fabric
Cut two 35cm x 48cm (14" x 19") rectangles of lining fabric
Cut two 35cm x 48cm (14" x 19") pieces of a heavy weight fusible interfacing
Optional Interior Pocket:
Cut one 14cm x 25cm (5.5" x 10") rectangle of a coordinating fabric
Cut one 14cm x 25cm (5.5" x 10") rectangle of lining fabric
Directions: (Remember to backstitch and trim threads as you go!)
Before you begin, remember to wash, dry and iron your fabric.
Cut all pieces from the above cutting list out of fabrics as indicated.
Following the directions on your fusible interfacing, fuse the heavy weight fusible interfacing to the back of the two exterior main fabric pieces.
Mark a 4.5cm(1¾”) square in the bottom corners on each of the main exterior fabric pieces. Trim and remove these squares. (For larger tote you will mark and remove a 6.5cm (2½”) square.)
Repeat step 4 for both pieces of lining fabric.

[image consists of what the pieces look like after trimming]
If making an interior pocket (otherwise skip to step 11 ) lay the two pocket rectangles right sides together and pin. Using a ¾ inch seam allowance sew around the entire perimeter of the rectangle leaving a 10cm (4”) gap at the bottom for turning the piece.
Trim corners of the pocket then turn it right side out, press out corners and tuck in the open edge.
Topstitch across the top edge of the pocket with ¼” from top edge.
Center the pocket on one of your pieces of lining fabric. Your pocket and lining should both be right side facing up. (The lining side of the pocket will be against the right side of the lining fabric. If you would rather make an exterior pocket simply sew the pocket to one of your exterior pieces in the same way.)
Carefully stitch the pocket in place along the sides and bottom edges ¼” from the outer edge of the pocket. This will also close the bottom edge of the pocket. If you want a divided pocket you can also stitch down the center of the pocket parallel to the sides.
Take your two exterior panel pieces laying them right sides together. Using a ½ in seam allowance sew along each of the sides and bottom, these will be 3 separate lines of stitching - do not sew across the squares we cut out earlier.
Repeat step 11 with the lining sections. Only this time you will leave a 10cm (4”) gap across the bottom that will be used for turning later.
Press open the seam allowances on your exterior and interior lining pieces.
It is now time to sew those corners where we cut out a square. Open out one corner and line up the seams, still with right sides facing, this will make a box like shape. You can now sew a straight line across the corner using a ½“ seam allowance. Do this for both corners on the exterior and interior pieces.
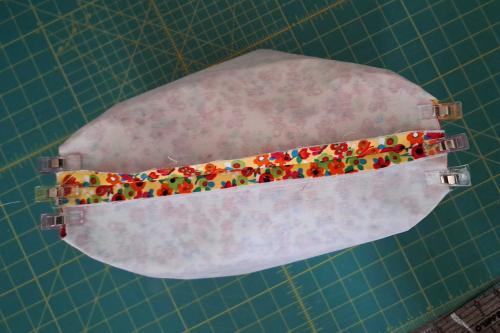
[image consists of an example of the step above]
Turn the exterior bag right side out and place it inside the lining bag with right sides together. Pin all the way around the top edge.
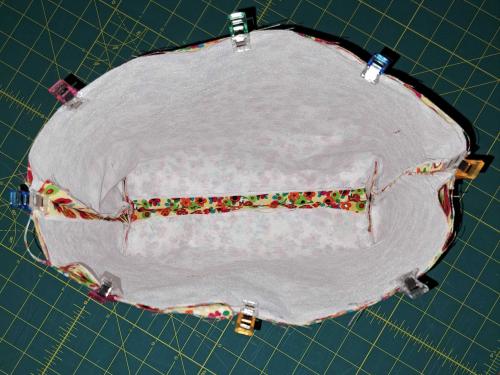
[image consists of an example of the step above]
Using a ½” seam allowance sew all the way around the top edge of the bag.
Using the opening we left in the bottom of the lining, turn the entire bag right side out. Take care to fully push out corners.
Carefully stitch the opening in the lining closed this can be done by machine or by hand. You may find doing this by hand looks better in this case.
Press the top edge of your bag and topstitch ¼” from top edge.
It is now time to add your grommets, while you can adjust where you place your grommets to suit you, a basic guideline is to find the center of the top edge of your bag. Mark a point 9cm (3½”) (you may want to go a bit wider for a regular size tote) on either side of the center. Do this on both sides of the bag. Place your grommet next to that mark, and about .5cm (¼”) down from the top edge of your bag. Using a marking pencil trace the interior circle of the grommet. (You will have 4 circles marked)
***If you have extra grommets it’s worth doing a quick test with those waste squares we cut out of the fabric earlier before doing the next 2 steps on your bag.***While most grommet tools have a piece made for cutting this circle out of the fabric, you may find you need to do so by hand so carefully snip the center of the circle then cut out that interior circle as cleanly as possible.
Following the directions for your grommets, apply a grommet to each of the 4 holes made above.
All that is left is to add your handles. Cut two 70-100cm (28-36”) lengths of rope. Insert one end of the rope through the grommet from inside the bag to outside and tie a knot to secure it in place, repeat with the other end on the same side of your bag, and then do the same on the other side with the other piece of yarn. (You may find you need to make a larger knot or even add a large bead to the end of the rope before knotting to be sure it won’t pull through the grommet. You can also use other styles of handle that can clip into or be secured through the grommets if you prefer)
Your mini tote is now complete!
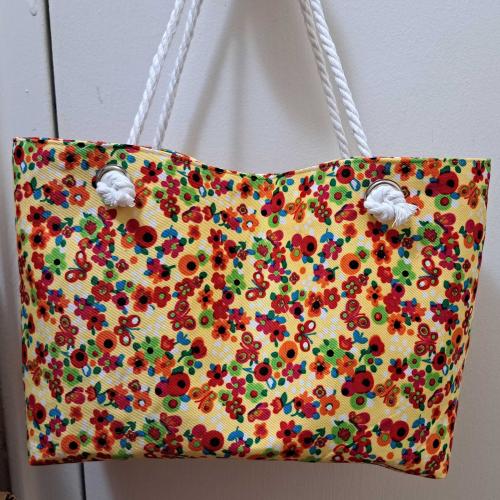
[image consists of a finished mini tote]
Would you prefer a mini or regular sized tote?
If you decide to sew your own, please share your work with us!
Part of Crafting a Creative Summer

@EmotionsListener
Mini tote bags would be such cute and ideal Christmas presents!
Yay, a great activity for the Autumn evenings!
💕💜

@EmotionsListener
For me, Sewing Saturday is a fun opportunity to get creative and make a tote bag that feels personal and useful for summer. I also appreciate the craftsmanship behind Tignanello Leather Handbags, especially their genuine Italian leather designs that balance timeless style with everyday functionality. Along with elegant handbags and accessories, Tignanello wallets are a great choice for keeping my essentials organized in style.